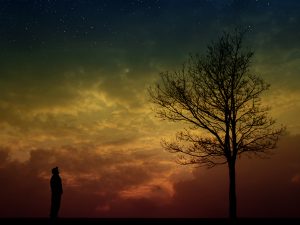
Atmosphere – Glowing Lamp
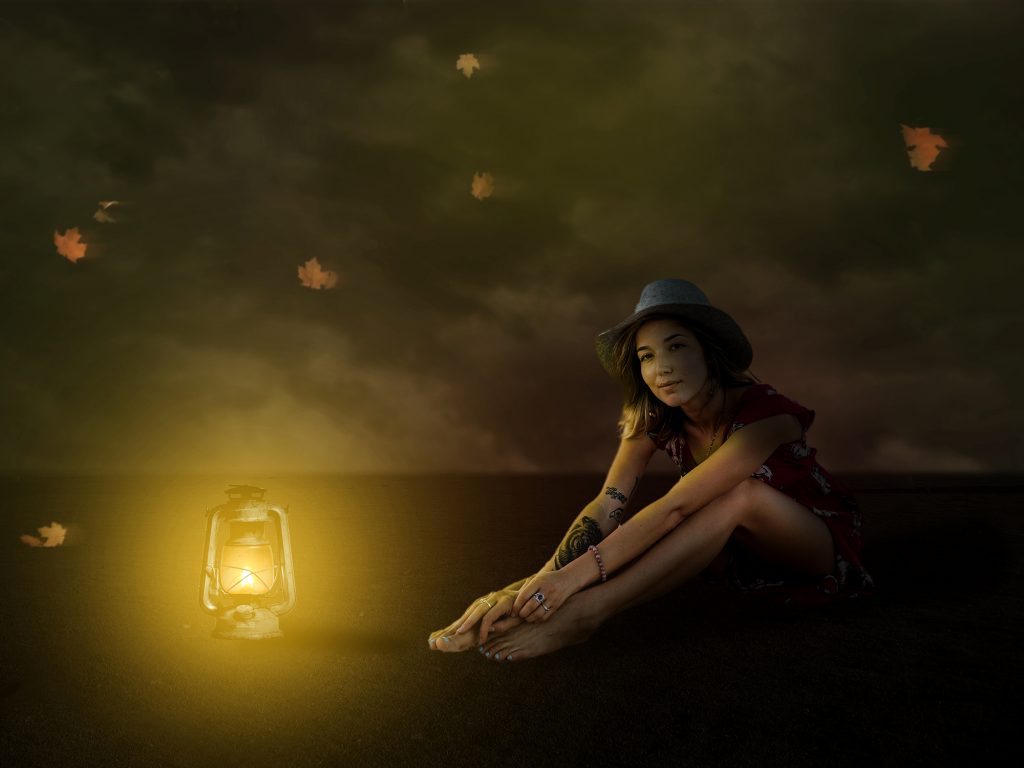
Photoshop Tutorial – ‘Atmosphere – Glowing Lamp’
We start with 5 photo from the zip file : field.jpg, dark sky.jpg,, model.jpg, lamp.png, leaves.png
Start
Open a new document.
Open the photo ‘field.jpg’ and import it into the main document.
Re-size and position over the whole document.
With ‘Shift’ pressed pull down on the top middle handle to squash the image so the horizon is on the bottom third.
Click the ‘Create Layer Mask’ icon at the bottom of the Layers window.
Select the ‘Gradient Tool’ from the left side toolbar, make sure it’s on ‘black to transparent’ and 100%.
Click on the horizon and pull down about 2mm (this will create a feather).
Click the ‘Create new fill or adjustment layer’ icon at the bottom of the Layers Window and select ‘Hue/Saturation’.
Attach these layers by ‘Alt+clicking’ between them.
Adjust ‘lightness’ to about -60.
Open the photo ‘dark sky.jpg’ and import it into the main document.
Re-size and position over the top on the document.
Move this layer to be just below the ‘grass’ layer.
Click the ‘Create new fill or adjustment layer’ icon at the bottom of the Layers Window and select ‘Hue/Saturation’.
Attach these layers by ‘Alt+clicking’ between them.
Adjust ‘lightness’ to about +40
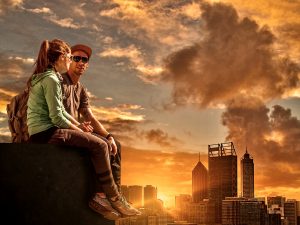
Model and Lamp
Open the photo ‘model.jpg’
Select the ‘Quick Selection Tool’ from the left side toolbar then click the ‘Select Subject’ icon on the second top toolbar.
You may have to refine the selection using the ‘Quick Selection Tool’.
Click the ‘Select and Mask’ icon on the second top toolbar.
Using the ‘Refine Edge Brush’ (second from the top) brush over the edge of the hair.
Feather by 1 pixel.
Shift Edge to -12%.
Tick Decontaminate Colour.
Right Click the ‘Layer Mask’ and select ‘Apply Layer Mask’.
Import this layer into the main document.
Re-size and position to suit.
Open the photo ‘lamp.png’ and import it into the main document.
Re-size and position on the left side of the image.
Shadows
Click the ‘Create new layer’ icon at the bottom of the Layers Window’ and move it to just below the ‘lamp’ layer.
Select the ‘Polygonal Selection Tool’ from the left side toolbar.
Select an area for the shadow from the lamp.
With a black brush paint in the shadow.
Select>Deselect
Filter>Blur>Gaussian Blur – about 20 should do it
Do the same again but this time for the model use a larger blur, about 80.
Shining
Click the ‘Create new layer’ icon at the bottom of the Layers Window’ and move it to the top of the ‘layers stack’.
Change the ‘blending mode’ to be ‘screen’.
Select the ‘brush’ tool from the left side toolbar.
Select the ‘foreground colour picker’ and select an ‘orangey glow’ colour.
With a soft brush just big enough to cover the lamp, click to paint in the glow.
Reduce the brush’s opacity to 75% and make the brush bigger.
Click to paint in a bigger glow.
Reduce the brush’s opacity to 50% and make the brush bigger.
Click to paint in a bigger glow.
Reduce the brush’s opacity to 25% and make the brush bigger.
Click to paint in a bigger glow.
Reduce ‘opacity’ to suit.
Model
Select the ‘model’ layer.
Click the ‘Create new fill or adjustment layer’ icon at the bottom of the Layers Window and select ‘Hue/Saturation’.
Attach these layers by ‘Alt+clicking’ between them.
Click the ‘colourize’ box and adjust ‘Hue’ to 26 and ‘Saturation’ to 50.
Invert the ‘layer mask’ by pressing ‘Ctrl+i’.
With a soft white paint brush at 100% paint the glow onto the left side of the model.
Click the ‘Create new fill or adjustment layer’ icon at the bottom of the Layers Window and select ‘Exposure’.
Attach these layers by ‘Alt+clicking’ between them.
Adjust the ‘exposure’ slider to about -3.
Invert the ‘layer mask’ by pressing ‘Ctrl+i’.
With a soft white paint brush at 100% paint the shadow onto the right side of the model.
Finishing
Select the ‘Hue/Saturation’ layer above the ‘field’ layer
Click the ‘Create new fill or adjustment layer’ icon at the bottom of the Layers Window and select ‘Hue/Saturation’, adjust ‘Lightness to about -60.
Open the photo ‘leaves.jpg’ and import it into the main document.
Re-size to cover the top of the image.
Change the ‘blending mode’ to be ‘screen’.
Click the ‘Layer Mask’ icon at the bottom of the Layers Window.
With a hard black brush paint away the leaves not required.
Copy the ‘leaves’ layer and select the bottom one.
Filter>Blur>Motion Blur – Angle = 0 Distance = 85
Select the left middle ‘handle and move it slightly to the right, until the blur is only on the right side of the leaves.