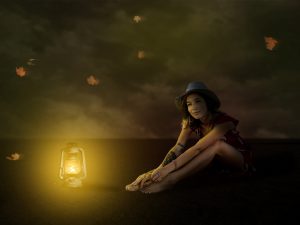
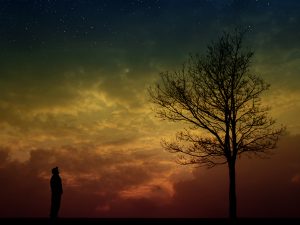
Atmosphere – Star Gazing
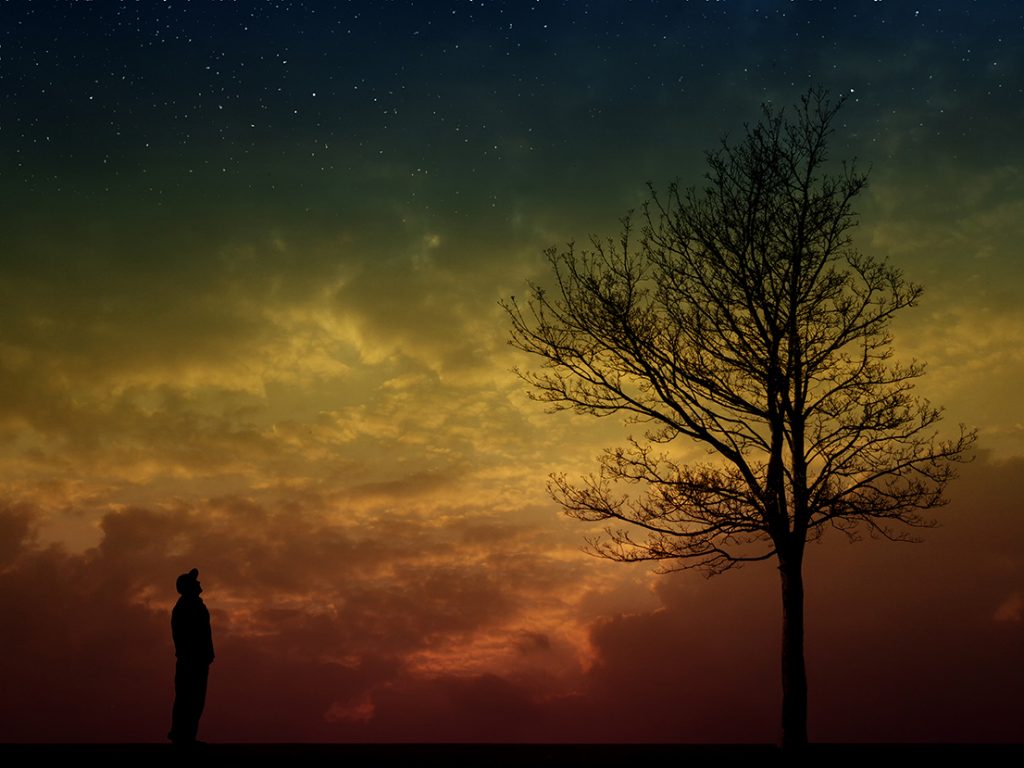
Photoshop Tutorial – ‘Star Gazing’
We start with 4 photos (see ZIP file) : tree.jpg, sky.jpg, stars.jpg and bloody useless teenager.jpg
Tree
Open a new document.
Open the photo ‘tree.jpg’.
Using the ‘Polygonal Lasso Tool’ make a selection to the left of the tree, of everything that wants to be removed.
Refine Edge – feather by 1 pixel.
Select the ‘foreground colour and use the ‘eye dropper’ to select the sky colour.
Select a soft brush and simply paint away the distractions.
Select>deselect.
Use the soft brush to blend to hard edges in the sky.
Repeat with the right side.
Import into the main document.
Re-size and position to suit (tree to the right).
Use the Rectangular Marquee Tool to select the left part of the image.
Edit>Free Transform – pull the left centre handle to the left to fill the empty part of the image.
Sky and Stars
Open the photo ‘sky.jpg’ and import it into the main document, position to suit.
Change the ‘Blending Mode’ to ‘Multiply’.
Open the photo ‘stars.jpg’ and import it into the main document, position to suit.
Change the ‘Blending Mode’ to ‘Screen’.
Add a ‘Layer Mask’ by clicking the ‘Add Layer Mask’ icon at the bottom of the layers window.
With a soft black brush – paint away the unwanted stars.
Gazer
Open the photo ‘bloody useless teenager.jpg’.
Import this layer into the main document.
Highlight the ‘gazer layer’ and right click inside the selection – Flip Horizontal.
Resize and position to suit.
Add a ‘Levels Adjustment Layer’ and attach it to the ‘gazer’ layer by ‘Alt+clicking’ between them.
Move the ‘Mid Point Slider to the right to make the ‘gazer’ into a silhouette.
3 Colour Gradient
Create a new layer at the top of the layers stack.
Select the ‘Gradient Tool’ make sure ‘Linear’ is selected.
Click the ‘down arrow’ to the right of the ‘gradient colour sample’ icon.
Select ‘blue’ then Select a 3 colour gradient.
Change the three handles on the colour sample to be dark blue-yellow-dark red.
Draw the gradient from top to bottom.
Change ‘Blending Mode’ to be ‘Soft Light’ or ‘overlay’
Finishing
Add a levels adjustment layer.