Atmosphere – romantic couple
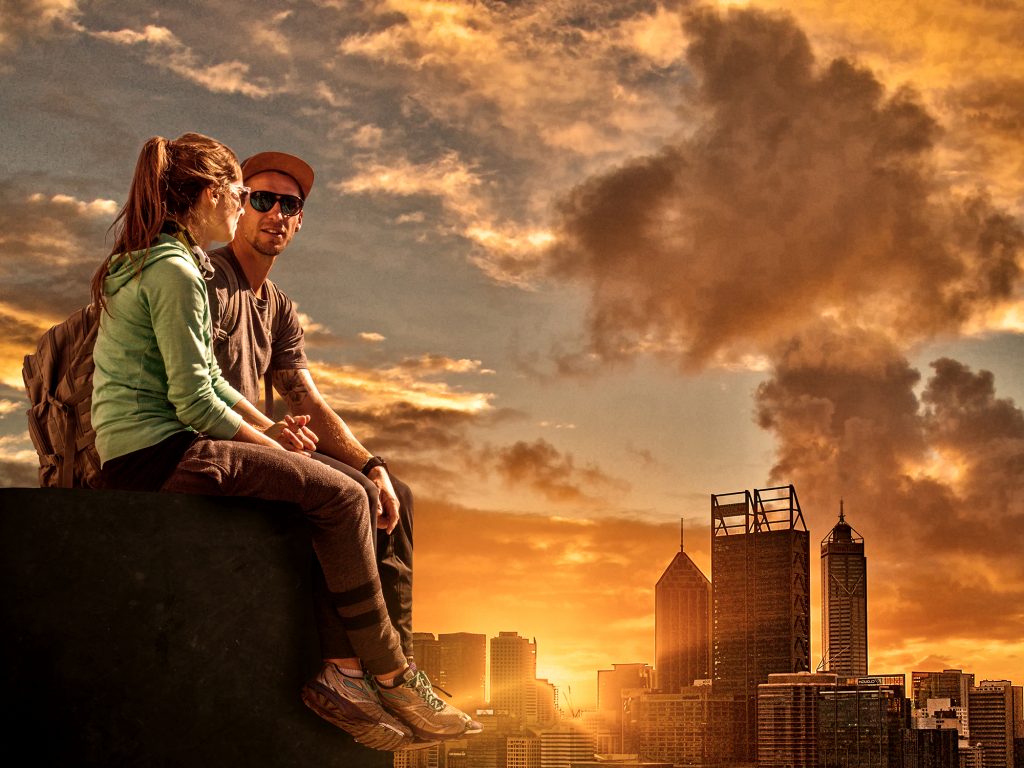
Photoshop Tutorial – ‘Atmosphere – Romantic Couple’
We start with 3 photo from the ZIP file : couple.pgn, concrete.jpg, sunset.jpg
Start
Open a new document.
Open the photo ‘couple.png’ and import it into the main document.
Re-size and position on the left.
Select the ‘polygonal selection tool’ from the left side toolbar.
Select the brick wall then place it on it’s own layer by pressing ‘Ctrl+j’.
New Wall
Open the photo ‘concrete.jpg’ and import it into the main document.
Re-size and position to cover the ‘brick wall’.
Attach this to the ‘brick wall’ layer by ‘Alt+clicking’ between them.
Click the ‘Create new fill or adjustment layer’ icon at the bottom of the Layers Window and select ‘Brightness and Contrast’, attach these layers by ‘Alt+clicking’ between them.
Adjust ‘Brightness’ – to 150 and ‘Contrast’ to 100.
Click the ‘Create new layer’ icon at the bottom of the Layers Window.
Attach these layers by ‘Alt+clicking’ between them.
Select the ‘Gradient tool’ from the left side toolbar, make sure it’s on ‘black to transparent’ and 30% ‘opacity’.
Draw a line from the bottom left corner to the models knee.
Click the ‘Create new layer’ icon at the bottom of the Layers Window.
Attach these layers by ‘Alt+clicking’ between them.
With a soft black brush on 100% opacity, paint in the shadow behind the model’s leg.
Reduce ‘opacity’ to suit (about 50%).
Sunset
Open the photo ‘sunset.jpg’ and import it into the main document.
Move this layer to be just below the ‘couple’ layer.
Edit>Transform>Flip Horizontal.
Re-size and re-position to suit.
Click the ‘Create new fill or adjustment layer’ icon at the bottom of the Layers Window and select ‘Colour Balance’, attach these layers by ‘Alt+clicking’ between them.
Adjust ‘Red’ to +40 and ‘Yellow’ to -30.
Finishing
Select the ‘couple’ layer.
Click the ‘Create new fill or adjustment layer’ icon at the bottom of the Layers Window and select ‘Colour Balance’, attach these layers by ‘Alt+clicking’ between them.
Adjust ‘Red’ to +50 and ‘Yellow’ to -40.
Select the top layer in the ‘layer stack’.
Click the ‘Create new fill or adjustment layer’ icon at the bottom of the Layers Window and select ‘Photo Filter’.
Increase ‘Density to about 70%.