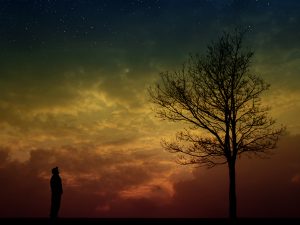
Atmosphere – House in the Mist
We start with 6 photo from the zip files: Zip1 and Zip2
Start
Open a new document.
Open the photo ‘field.jpg’ and import it into the main document.
Re-size and position the field on the bottom.
Open the photo ‘lightning.jpg’ and import it into the main document.
Re-size and position at the top of the document.
Click the ‘Add layer mask’ icon at the bottom of the ‘Layers Window’.
With a soft black brush blend in the two photos.
Click the ‘Create new fill or adjustment layer’ icon at the bottom of the ‘Layers Window’ and select ‘Hue/Saturation’, attach this to the layer by ‘Alt’ clicking between the two layers.
Adjust ‘Saturation slider’ to -70 and ‘Lightness’ slider to -40ish.
Open the photo ‘forest.jpg’ and import it into the main document.
Re-size and position at the bottom of the document.
Click the ‘Add layer mask’ icon at the bottom of the ‘Layers Window’.
With a soft black brush blend in the top of the trees and remove everything from the bottom third.
Driveway
Open the photo ‘street.jpg’ and import it into the main document.
Re-size and position at the bottom of the document.
Click the ‘Add layer mask’ icon at the bottom of the ‘Layers Window’.
With a soft black brush blend away everything except the cobbles.
Open the photo ‘track.jpg’ and import it into the main document.
Re-size and position at the bottom of the document (the track covering the cobbles).
Click the ‘Add layer mask’ icon at the bottom of the ‘Layers Window’.
With a soft black brush blend away everything except the over cobbles.
Reduce ‘opacity’ to 80%
Open the photo ‘tree.png’ and import it into the main document.
Re-size and position at the left side of the document, on the bottom third line.
Reduce ‘opacity’ to 70%
House
Open the photo ‘ruin.jpg’.
Select the ‘quick selection tool’ from the left side toolbar and click the icon, on the second top line, ‘select subject’.
Use the ‘quick selection tool’ to fix the selection (‘Alt’ removes selection while ‘shift’ adds to the selection).
Select>Modify>Feather 1 pixel.
Place the selection on it’s own layer by pressing ‘Ctrl+j’.
Import this selection into the main document.
Re-size and re-position in the middle of the image, at the end of the driveway.
Click the ‘Add layer mask’ icon at the bottom of the ‘Layers Window’.
With a small soft black brush, just using the feather, paint around the edge of the house (adding a little mist to the edge).
Click the ‘Create new fill or adjustment layer’ icon at the bottom of the ‘Layers Window’ and select ‘Hue/Saturation’, attach this to the layer by ‘Alt’ clicking between the two layers.
Adjust ‘Saturation slider’ to -70 and ‘Lightness’ slider to -40ish.
Click the ‘Create new fill or adjustment layer’ icon at the bottom of the ‘Layers Window’ and select ‘Curves’, attach this to the layer by ‘Alt’ clicking between the two layers.
Pull down the top right ‘marker’ about a third (this will darken the house, then pull up the bottom left ‘marker’ up about a third (this will move the house into the mist).
Open the photo ‘room.jpg’.
Using the ‘rectangular marquee tool’ from the left side toolbar, select part of the light shade.
Place the selection on it’s own layer by pressing ‘Ctrl+j’.
Import this selection into the main document.
Re-size and re-position in the right top window.
Filter>Blur>Gaussian Blur 4% should do to create a glow.
Man at the Gate
Open the photo ‘fencing.png’ and import it into the main document.
Re-size and position so that the top of the wall is along the bottom third line.
Make a copy of this layer by pressing ‘Ctrl+j’ then turn it off by ‘clicking’ the ‘eye’ icon beside the layer.
Select the top layer.
Click the ‘Add layer mask’ icon at the bottom of the ‘Layers Window’.
With a small soft black brush blend in the grass on the bottom of the wall.
Click the ‘Create new fill or adjustment layer’ icon at the bottom of the ‘Layers Window’ and select ‘Hue/Saturation’, attach this to the layer by ‘Alt’ clicking between the two layers.
Adjust ‘Saturation slider’ to -70 and ‘Lightness’ slider to -50ish.
Select the bottom ‘fencing’ layer and turn it on by ‘clicking’ the ‘eye’ icon beside the layer.
Image>Adjustments>Hue and Saturation adjust lightness to -100.
Edit>Transform>Flip Vertical.
Re-position to match the shadow to the gate.
Edit>Transform>Warp
Select ‘Grid’ icon on the second top toolbar and select ‘5×5’.
Warp the shadow a little so it’s not uniform.
Filter>Blur>Gaussian Blur 4%.
Reduce ‘opacity’ to 40%.
Open the photo ‘old man.jpg’ and import it into the main document.
Re-size and position so he is in front of the left gate.
Make a copy of this layer by pressing ‘Ctrl+j’.
Select the bottom layer.
Edit>Transform>Flip Vertical.
Re-position to match the shadow to the feet and reduce ‘opacity’ to 40%.
More Mist
Open the photo ‘more fog.jpg’ and import it into the main document.
Re-size and position to cover the whole image and reduce ‘opacity’ to 40%.
Open the same photo again and import it into the main document.
Position the top to match the top of the fence, stretch out the sides (by pressing the ‘shift’ key while dragging out the sides). This makes the fog more wispy.
Click the ‘Add layer mask’ icon at the bottom of the ‘Layers Window’.
With a soft black brush blend in the top and reduce ‘opacity’ to 50%.
Finishing
Select the ‘Gradient tool’ from the left side toolbar, make sure it is on ‘black to transparent’ and ‘linear’ at 100% and ‘click’ at the bottom of the image and drag up about 15mm, reduce ‘opacity’ to suit (about 40%).
Click the ‘Create new fill or adjustment layer’ icon at the bottom of the Layers Window and select ‘Gradient Map’ make sure it’s on ‘black to white’ and change the ‘blending mode’ to ‘soft light’, reduce ‘opacity’ to about 20% (this increases the contrast).
Click the ‘create new layer’ icon at the bottom of the ‘layers window’ and move it to the top of the ‘layers stack’.
With a large soft black brush at 20% opacity – paint in a vignette, repeat until you get the desired effect.