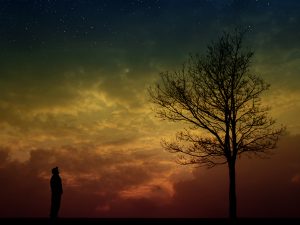
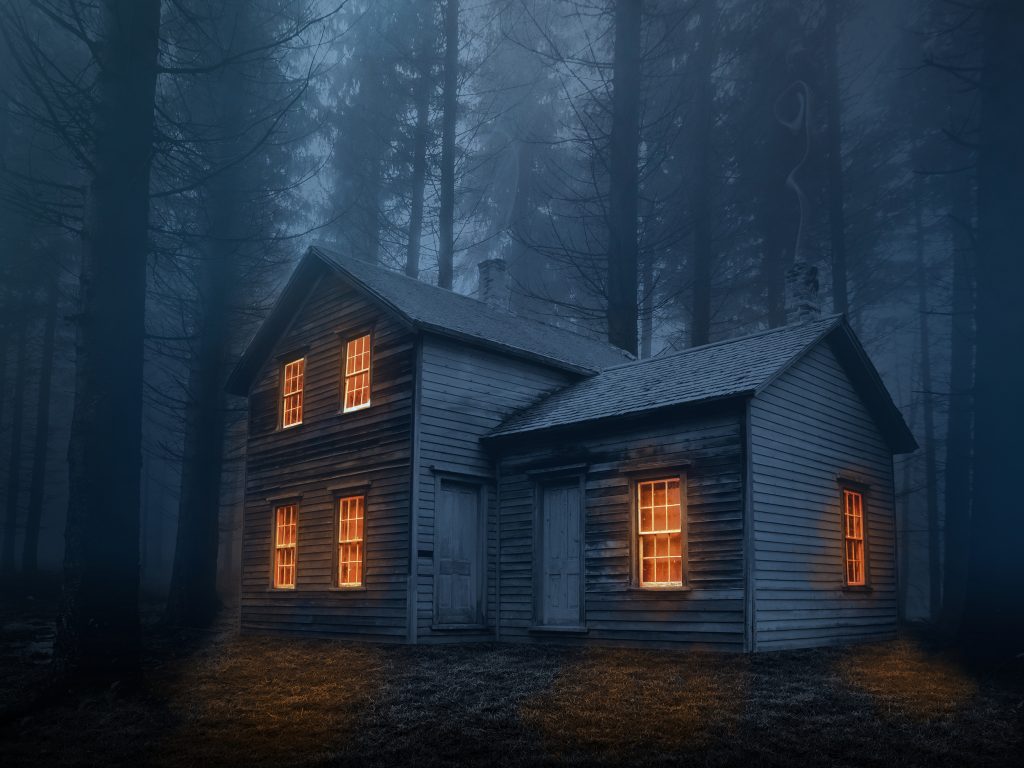
Atmosphere – House in the Woods
We start with 6 photo from the zip file:
trees.jpg
house.jpg
grass.jpg
smoke 1.png
smoke 2.png
smoke.jpg
and 1 brush, which you can download from :
www.zanuara.com/2019/08/download-azbrushes.html
Start
Open a new document.
Open the photo ‘trees.jpg’ and import it into the main document.
Re-size and position to suit.
Image>Transform>Perspective – pull out a top corner until the trees are vertical.
Click the ‘Create new fill or adjustment layer’ icon at the bottom of the ‘Layers Window’ and select ‘Hue/Saturation’, attach this to the layer by ‘Alt’ clicking between the two layers.
Adjust ‘Saturation’ slider to -70.
House
Open the photo ‘house.jpg’ and Use the ‘polygonal lasso tool’ to select the stone base of the house.
Press ‘Delete’ to remove selection then import this image into the main document.
Image>Transform>Flip Horizontal.
Re-size and position to suit.
Click the ‘Create new fill or adjustment layer’ icon at the bottom of the ‘Layers Window’ and select ‘Hue/Saturation’, attach this to the layer by ‘Alt’ clicking between the two layers.
Adjust ‘Saturation slider’ to -70 and ‘Lightness’ slider to -50.
Grass
Open the photo ‘grass.jpg’ and import it into the main document.
Re-size and position to cover bottom of the main document.
Move this layer to be just below the ‘house’ layer.
Click the ‘Add layer mask’ icon at the bottom of the ‘Layers Window’.
Select the ‘Gradient tool’ from the left side toolbar, make sure it is on ‘black to transparent’ at 100% and ‘click’ at where approximately the base of the tree on the left and drag at 45% downward for about 10mm, repeat until the blend is correct.
Repeat on the right side of the image.
Click the ‘Create new fill or adjustment layer’ icon at the bottom of the ‘Layers Window’ and select ‘Hue/Saturation’, attach this to the layer by ‘Alt’ clicking between the two layers.
Adjust ‘Saturation’ slider to -70.
Click the ‘Create new fill or adjustment layer’ icon at the bottom of the ‘Layers Window’ and select ‘Brightness and Contrast’, attach this to the layer by ‘Alt’ clicking between the two layers.
Adjust ‘Brightness’ slider to -150 and ‘Contrast’ to -20.
Click the ‘Add new layer’ icon at the bottom of the ‘Layers Window’ and attach this to the layer by ‘Alt’ clicking between the two layers.
With a soft black brush at 50%, paint in the shadow of the house, reduce ‘opacity’ to 50%.
Shadows and highlights
Select the top layer (hue/sat layer for the house).
Click the ‘Add new layer’ icon at the bottom of the ‘Layers Window’ and attach this to the layer by ‘Alt’ clicking between the two layers.
With a soft black brush at 100%, darken the bottom of the house to blend with the shadow of the house, reduce ‘opacity’ to 40%.
Click the ‘Add new layer’ icon at the bottom of the ‘Layers Window’ and attach this to the layer by ‘Alt’ clicking between the two layers.
With a soft white brush at 5%, lighten the roof of the house.
Forest and Moonlight
Highlight the ‘trees’ layer and change the ‘blending mode’ to ‘multiply’.
Create a new layer under the ‘trees’ by ‘Control Clicking’ the ‘add new layer’ icon at the bottom of the ‘layers window’.
Click the ‘Create new fill or adjustment layer’ icon at the bottom of the ‘Layers Window’ and select ‘solid colour’, select a dark grey colour (about quarter the way up the left hand side).
Highlight the ‘layer mask’.
Select the ‘Gradient tool’ from the left side toolbar, make sure it is on ‘black to transparent’ at 100% and ‘radial’ then ‘click’ at the middle top of the image and drag to the bottom right of the house.
Windows
Using the ‘polygonal lasso tool’ and holding down the ‘shift’ key, select all six windows.
Click the ‘Create new fill or adjustment layer’ icon at the bottom of the ‘Layers Window’ and select ‘Hue/Saturation’, tick the ‘colorize’ box and adjust ‘Hue = 17, ‘Saturation’ = 100, Lightness = 50 and change ‘blending mode’ to ‘overlay’.
Copy this layer by pressing ‘Ctrl+j’.
Reduce ‘lightness’ to 20 and change ‘blending’ mode to ‘colour dodge’.
Copy this layer again by pressing ‘Ctrl+j’.
Copy this layer yet again by pressing ‘Ctrl+j’.
Filter>Blur Gaussian Blur – somewhere around 100 should add a glow to the windows.
Click the ‘Create new fill or adjustment layer’ icon at the bottom of the ‘Layers Window’ and select ‘levels’, adjust the ‘black pointer’ to 12
Click the ‘Create new fill or adjustment layer’ icon at the bottom of the ‘Layers Window’ and select ‘Hue/Saturation’, tick the ‘colorize’ box and adjust ‘Hue = 30, ‘Saturation’ = 100, Lightness = 0
Highlight the layer mask then press ‘Ctrl+i’ to invert the colour.
Select the ‘brush’ tool from the left side toolbar, click the down arrow to the right of the brush size on the second top menu bar and open ‘AZBrushes’ then open ‘Effects’ and select ‘CLOD 1’ (the first brush).
With a white brush at 20% ‘opacity’ click the brush over the windows to create ‘glow’ and on the grass to create light spill from the windows.
Click the ‘Create new fill or adjustment layer’ icon at the bottom of the Layers Window and select ‘Photo Filter’, select the ‘Cooling Filter (82) increase the slider to 40% to make the image look ‘cold’.
Smoke and Fog
Open the photo ‘smoke 1.jpg’ and import it into the main document.
Change ‘blending mode’ to ‘screen’ and re-size and re-position over a chimney.
Do the same with ‘smoke 2.jpg’.
Open the photo ‘smoke.jpg’ and import it into the main document.
Re-size and position to suit.
Click the ‘Add layer mask’ icon at the bottom of the ‘Layers Window’.
With a super large soft black brush at 50% opacity paint away half the fog from the whole image.
With a large soft black brush at 10% opacity, paint away the fog over the house and foreground until you get the desired effect.
Finishing
Select the ‘Gradient tool’ from the left side toolbar, make sure it is on ‘black to transparent’ and ‘linear’ at 100% and ‘click’ at the bottom of the image and drag up about 15mm, reduce ‘opacity’ to suit (about 40%).
Click the ‘Create new fill or adjustment layer’ icon at the bottom of the Layers Window and select ‘Gradient Map’ make sure it’s on ‘black to white’ and change the ‘blending mode’ to ‘soft light’, reduce ‘opacity’ to about 15% (this increases the contrast).
Click the ‘create new layer’ icon at the bottom of the ‘layers window’ and move it to the top of the ‘layers stack’.
With a large soft black brush at 20% opacity – paint in a left side vignette, repeat until you get the desired effect (to balance up the left and right sides).