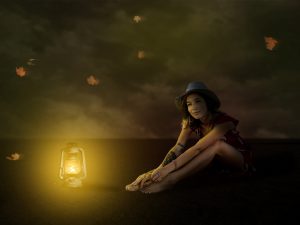
Atmosphere – Lady from the Lake
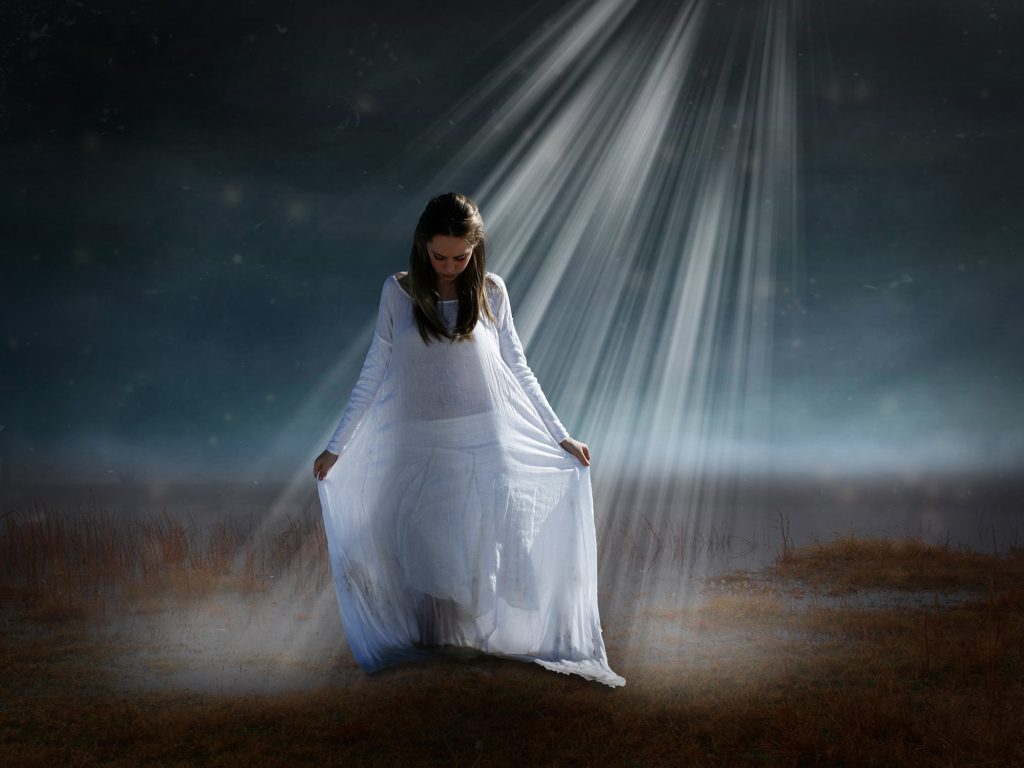
Photoshop Tutorial – ‘Lady from the Lake’
We start with 6 photo from the ZIP file: fog.jpg, sky.jpg, model.jpg, fairy dust.jpg and dust particles.jpg
Start
Open a new document.
Open the photo ‘fog’ and import it into the main image.
Re-size to cover the whole width of the image.
Squash the image down by pulling down the top middle handle with ‘Shift’ pressed, so that the lake bank runs along the bottom third line.
Click the ‘Add layer mask’ icon at the bottom of the ‘Layers Window’.
Select the ‘Gradient Tool’ from the left side toolbar, make sure it’s on black to transparent and ‘click’ just above the top of the lake bank and drag to just below the top of the lake bank.
Open the photo ‘sky.jpg’ and import it into the main document.
Re-size and position at the top of the document.
Move this layer to be just below the ‘fog’ layer.
Model
Open the photo ‘model’.
Select the ‘Quick Selection Tool’ from the left side toolbar.
Click the icon ‘Select Subject’ from the second top toolbar (you may have to use the ‘Quick Selection Tool’ to nudge the selection into place).
Click the icon ‘Select and Mask’ from the second top toolbar
Select the ‘Refine Edge Brush Tool’ from the left side toolbar (second down) and brush around the model’s hair.
Feather by 1 pixel.
Shift Edge to -12.
Tick ‘Decontaminate Colours’.
Import this layer into the main image, re-size and position to suit.
Click the ‘Create New Layer’ icon at the bottom of the ‘layers Window’ and move it just below the ‘model’ layer.
With a soft black brush paint in the shadow beneath the model’s dress and reduce ‘opacity’ to about 70%.
Sun Beams
Click the ‘Create New Layer’ icon at the bottom of the ‘layers Window’ and move it to the top of the ‘layers stack’.
Select the ‘Brush Tool’ from the left side toolbar.
Click the ‘down arrow’ on the right hand side of the ‘brush size’ icon on the second top toolbar.
Click the ‘down arrow’ for ‘Dry Media Brushes’ and select ‘KYLE Bonus Chunky Charcoal’
Increase the size of the brush until it is larger than the model.
Select ‘white’ as the foreground colour and click twice in the centre of the image
Filter>Blur>Radial Blur, Change ‘Blur Method’ to ‘Zoom’
Pick up the centre of the ‘Blur Centre Box’ and move it to the top centre.
Increase ‘Blur Amount’ to 70, click ‘OK’.
Repeat until correct.
Select the ‘Move Tool’ from the left side toolbar and while pressing the ‘Shift’ key, compress the sides of the beam, re-position to suit.
Move this layer to be just below the ‘model’ layer.
Click the ‘Add layer mask’ icon at the bottom of the ‘Layers Window’.
With a soft black brush paint away the bottom of the sun beam (so it’s falling on and around the model).
Pools of Light and Shadow
Click the ‘Create New Layer’ icon at the bottom of the ‘layers Window’ and move it to just above the ‘model’s shadow’ layer.
With a soft white brush paint a splotch to the left of the model’s ankle.
Select the ‘move’ tool from the left side toolbar and compress the height and elongate the width of the splotch until it looks like the light reflecting off the water.
Reduce ‘opacity’ to suit.
Copy this layer by pressing ‘Ctrl+j’ and move to the other side of the model.
Create a new layer this time with a black splotch to be the shadow in front of the model.
Model (again)
Select the ‘model’ layer.
Click the ‘Create new fill or adjustment layer’ icon at the bottom of the Layers Window and select ‘Levels’.
Attach these layers by ‘Alt+clicking’ between them.
Move the centre point (under the graph) to the right to darken the model (0.71 should do it).
Select the ‘layer mask’ and with a soft black brush paint back the sunlight on the right of the model and her face.
Dust and lights
Open the photo ‘dust particles’ and import it into the main image, re-size to cover the whole image.
Change ‘blending mode’ to ‘Screen’ and reduce opacity to suit.
Open the photo ‘fairy dust’ and import it into the main image, re-size to cover the whole image.
Change ‘blending mode’ to ‘Screen’ and reduce opacity to suit.
Finishing
Select the top layer in the ‘layers stack’.
Click the ‘Create new fill or adjustment layer’ icon at the bottom of the Layers Window and select ‘Gradient Map’ make sure it’s on ‘black to white’ and change the ‘blending mode’ to ‘soft light’, reduce ‘opacity’ to about 20% (this increases the contrast).
Click the ‘create new layer’ icon at the bottom of the ‘layers window’ and move it to the top of the ‘layers stack’.
With a large soft black brush at 20% opacity – paint in a vignette, repeat until you get the desired effect.